

If your phone rings, goes unanswered, and the caller has nowhere to leave a message, you can end up missing information you actually needed a callback number, a delivery update, a scheduling change. That’s usually a sign that voicemail either isn’t set up yet or wasn’t reconfigured after a new phone, SIM swap, or carrier change.
If you’ve landed here, chances are you’re either setting up a new Android phone or you’ve realized your voicemail still isn’t configured. Either way, you’re in the right place.
Setting up voicemail on Android isn’t complicated, but it does vary quite a bit depending on your carrier, your phone model, and which type of voicemail system you want to use. This guide walks you through all of it, so you know exactly which steps apply to you.
What Kind of Voicemail Does Android Support?
Before jumping into steps, let me quickly explain the three types of voicemail you might encounter on an Android phone. Knowing which one you’re dealing with saves a lot of frustration.
Traditional dial-in voicemail is the oldest type. When someone calls and you don’t answer, the call routes to your carrier’s server. The caller leaves a message, and you retrieve it by calling into a number and navigating a menu using your keypad. It works, but it’s slow and a bit old-fashioned.
Visual Voicemail (VVM) shows your messages in a list just like an inbox. You can tap any message to play it, skip around, read a transcript, and delete it without ever calling into a system. This is what most people use today.
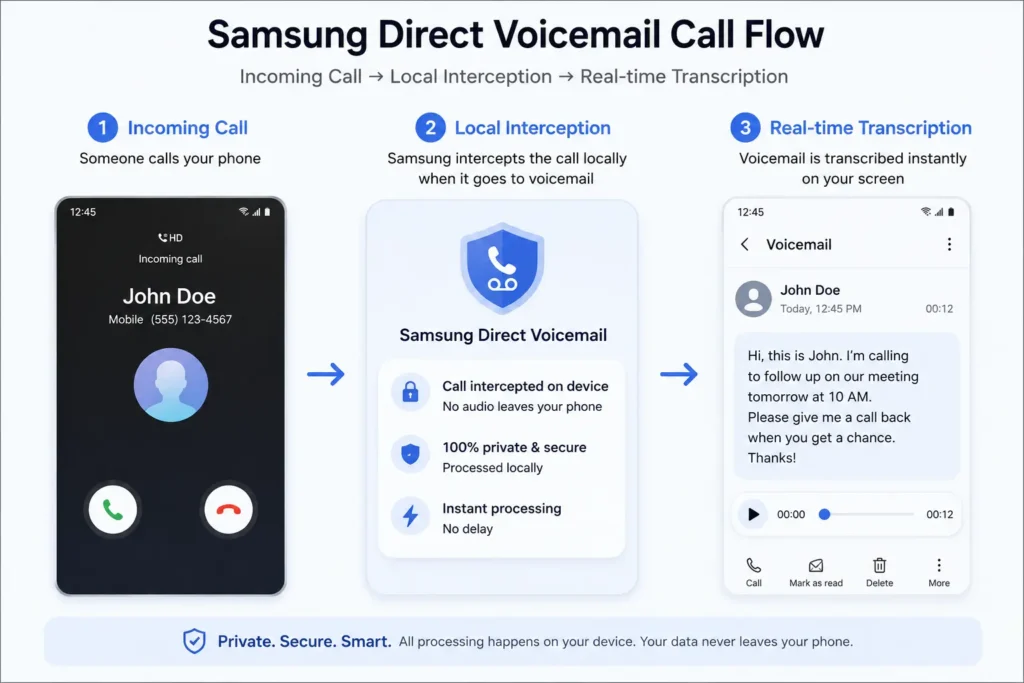
On-device voicemail (like Samsung Direct Voicemail) is the newest generation. Your phone itself intercepts the call, plays your greeting locally, records the message, and transcribes it in real time using an AI chip on the device. No carrier servers involved at all.
Now let’s set each one up.
How to Set Up Basic Dial-In Voicemail on Android
This is the most universal method. It works on every carrier and every Android phone, regardless of brand or model.
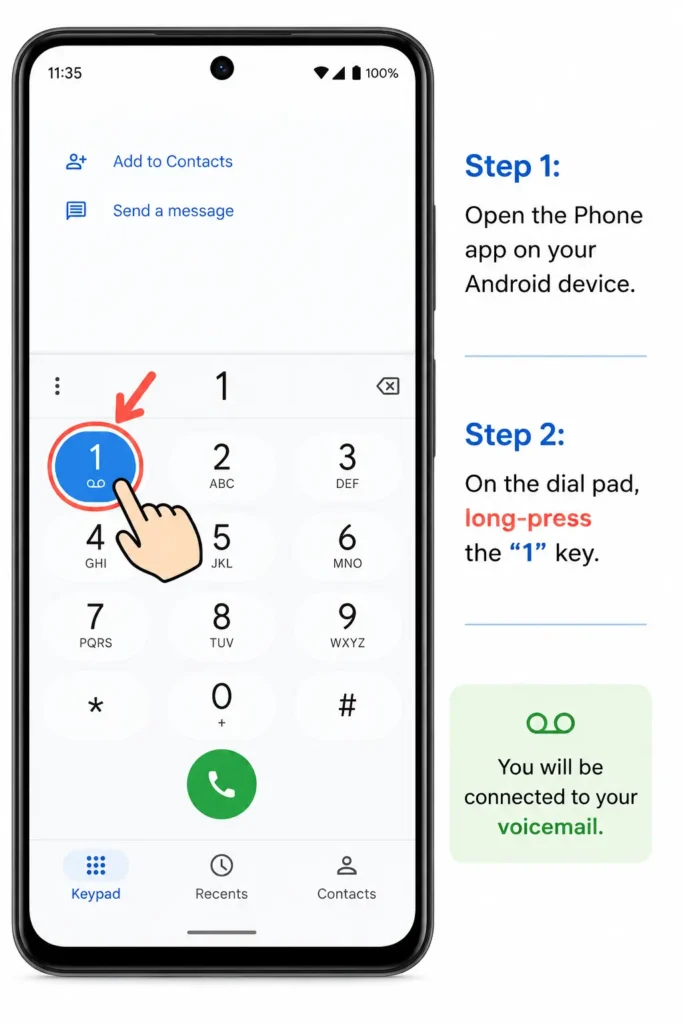
Open your default Phone app and go to the dial pad. Press and hold the number 1 key. This is a pre-programmed speed dial shortcut that connects you directly to your carrier’s voicemail system.
Most carriers will walk you through a quick setup over the phone. You’ll typically be asked to create a PIN (usually 4 to 15 digits), record your name, and set up a greeting. The default PIN is often the last four digits of your phone number, but you’ll be prompted to change it right away.
Once you’ve completed those steps, your voicemail is live. Anyone who calls and doesn’t reach you will be sent to that system automatically.
What If the Long-Press Doesn’t Work?
This happens more often than you’d think especially on unlocked phones or phones that have been switched between carriers. If pressing and holding the 1 key doesn’t dial anything (or dials the wrong number), you’ll need to manually enter your carrier’s voicemail number in the settings.
Here’s how to fix it. Open the Phone app, tap the three-dot menu in the top-right corner, and select Settings. Look for Voicemail, then tap Advanced Settings, then Setup, and finally Voicemail Number. Type in your carrier’s voicemail access number and tap OK.
If you’re not sure what that number is, a quick call to your carrier’s support line will get it for you in seconds. You can also check your carrier’s support page here are links to the main ones: Verizon Support, AT&T Support, and T-Mobile Support.
How to Set Up Visual Voicemail on Android
Visual voicemail is genuinely a better experience for most people. Being able to glance at a list of messages and pick the one you want to listen to first, without pressing through a bunch of keypad prompts, is simply more practical than dial-in voicemail.
The setup process depends slightly on which phone app you’re using.
Using the Google Phone App
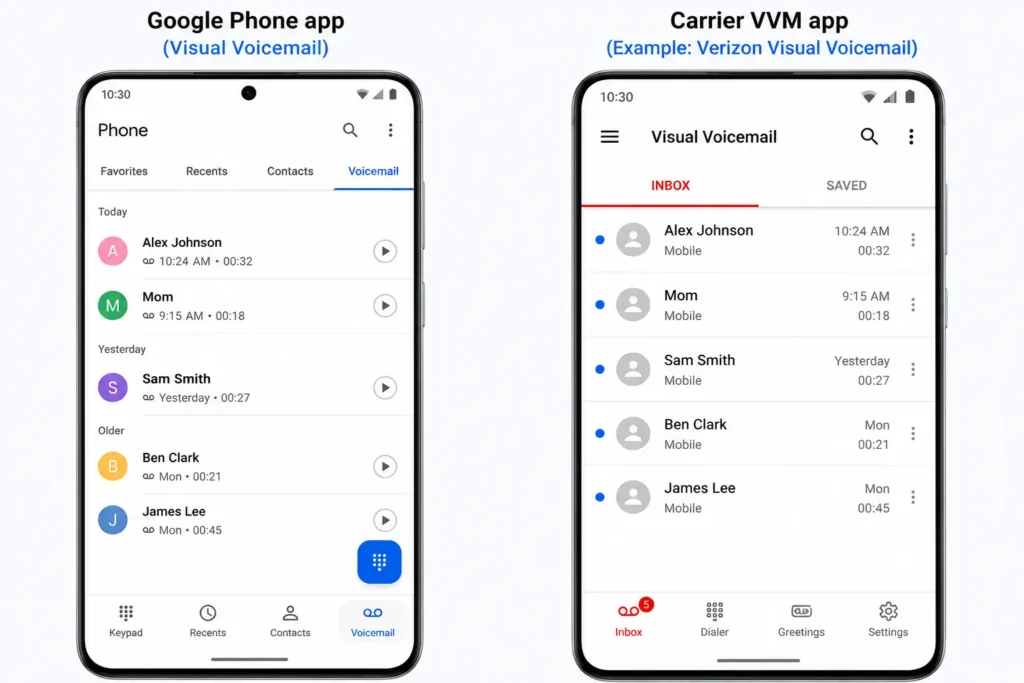
The Google Phone app has built-in visual voicemail support for many major carriers including AT&T, T-Mobile, Google Fi, O2, and Orange. If you’re on one of these carriers, setup is simple.
Open the Phone app and tap the three-dot menu at the top right. Go to Settings, then select Voicemail. Look for the Visual Voicemail toggle and switch it on. You may be asked to agree to your carrier’s terms and grant a few permissions (SMS access, call access, notifications). Accept those, and you’re done.
After a minute or two, you’ll notice a new Voicemail tab appears at the bottom of the Phone app. That’s your inbox. Every message that comes in will show up there as a listed item you can play, read, or delete individually.
Using a Carrier-Specific Voicemail App
If your phone didn’t come with the Google Phone app, or if your carrier isn’t supported natively, you’ll need to download your carrier’s own voicemail app from the Google Play Store.
Verizon has the Verizon Visual Voicemail app. AT&T has AT&T Visual Voicemail. T-Mobile has its own too. Search your carrier’s name plus “visual voicemail” in the Play Store and install the official one.
Here’s something important: after installing it, turn off your Wi-Fi before opening the app. Visual voicemail apps from carriers need a direct cellular data connection to authenticate your account and sync messages Wi-Fi alone won’t let the app connect, even if that Wi-Fi network has internet access.
Once you’re on mobile data, open the app, grant the permissions it asks for, and it’ll set itself up using background SMS messages your carrier sends silently to your device. It sounds technical, but from your end it just looks like a progress screen for 30 seconds.
Setting Up Visual Voicemail on a Dual-SIM Android Phone
If you’re running two SIMs (or an eSIM alongside a physical SIM), each one needs its visual voicemail set up independently. Android handles them through separate channels to avoid any signal crossover between the two lines.
Go to Phone app → three-dot menu → Settings → Voicemail. You’ll see both SIM profiles listed. Tap the first one, enable Visual Voicemail, then go back and do the same for the second. The voicemail tab in your dialer will then show separate, labeled sections for each line so messages don’t get mixed up.
One thing to keep in mind: if you ever switch which SIM handles your data, you may need to re-enable visual voicemail for that SIM. It’s a small annoyance, but it only takes a few seconds once you know why it’s happening.
How to Enable Voicemail Transcription
Voicemail transcription turns the audio message into text so you can read it at a glance without playing anything. It’s incredibly useful when you’re in a meeting, on public transport, or anywhere you can’t put your phone to your ear.
In the Google Phone app, go to Settings → Voicemail and look for Voicemail Transcription. Toggle it on.
One privacy detail worth knowing: Google states that transcribed voicemails aren’t linked to your Google Account and aren’t permanently stored by Google recordings and transcripts live in your Phone app and are deleted if you turn transcription off. That’s a reasonable privacy posture, though the transcription itself runs through Google’s systems rather than staying purely on-device. The feature requires Android 8.0 or higher and currently works in English and Spanish.
Verizon users can also get cloud-based transcription through the Premium Visual Voicemail plan. That tier transcribes the first 45 seconds of each message, bumps your inbox capacity to 40 messages, and allows messages up to 5 minutes long, for $2.99 per month per line. If you’re a heavy voicemail user, it might be worth it manage the subscription through My Verizon or by dialing *611.
Samsung Direct Voicemail: The Future of Voicemail on Android
If you have a compatible Samsung Galaxy device running One UI 8.5, you may have access to something genuinely different: Samsung Direct Voicemail. Availability has been rolling out gradually since early 2026 and varies by device, region, and software build some users have reported the feature appearing and then disappearing again between beta updates. If you don’t see it on your phone yet, check for a system update or look for rollout news in the Samsung Members app.
This isn’t carrier-hosted at all. When someone calls you and you don’t answer (or the call rings past a time you set), your phone itself takes over. It plays your greeting locally, records the caller’s message, and transcribes what they’re saying in real time using the phone’s Neural Processing Unit the same chip that powers other on-device AI features.
What this means practically is pretty cool. You can actually watch the transcription appear on screen as the caller speaks and decide mid-message whether you want to pick up. Think of it like reading a text message in real time except it’s actually a voice call happening live.
Everything the audio and the transcript stays on your device in secure local storage. Nothing goes to a carrier server.
How to Set It Up
Open the Samsung Phone app and tap the three-dot menu. Go to Settings, then tap Direct Voicemail. Toggle it on and accept the terms of service.
To have missed calls automatically routed here, tap Auto send to voicemail and enable it. You can then choose a ring delay 5, 10, or 20 seconds before the call gets intercepted.
If you want to send a specific incoming call to Direct Voicemail manually while it’s ringing, swipe up from the bottom of the screen during the call, tap More Options, and select Direct Voicemail.
To read a saved message afterward, open the Phone app, go to Recents, tap the call entry, and select Voicemail Message.
One limitation worth noting: this only works for standard voice calls. Video calls can’t be routed to Direct Voicemail.
Routing Missed Calls to Google Voice Instead
Some people prefer to skip the carrier voicemail system entirely and use Google Voice as their voicemail provider instead. It gives you a separate number, web access to your messages, and solid transcription.
To do this, you use something called Conditional Call Forwarding basically you’re telling your carrier’s network “if I don’t answer, send the call to this other number instead of your voicemail.”
You do this by dialing special codes directly from your phone’s dial pad. The codes vary by carrier:
For AT&T, you’d dial *61*[Your Google Voice Number]# to forward unanswered calls.
For T-Mobile, the combined forwarding code is **004*[Your Google Voice Number]#.
For Verizon, dial *71 followed immediately by your 10-digit Google Voice number.
After dialing, tap Send and wait for the carrier’s confirmation message. To undo this later, AT&T uses ##61#, T-Mobile uses ##004#, and Verizon uses *73.
For detailed steps on linking your number, check Google’s official support page.
Fixing Common Voicemail Problems on Android
Setting voicemail up is one thing. Keeping it working is another. Here are the most common issues Android users run into, along with what actually fixes them.
Stuck Voicemail Notification That Won’t Go Away
This is probably the most annoying voicemail bug on Android. You’ve listened to all your messages, deleted them, and yet that little envelope icon stays in the notification bar forever.
The quickest fix is to go to Settings → Apps, show system apps, find the Phone app (or Call Settings on Samsung), go to Notifications → Notification Categories, find Voicemail, toggle it off, wait a minute, and toggle it back on. This resets the message waiting indicator without touching anything else.
If that doesn’t work, go back to the same app, tap Storage, and clear both the cache and the data. This resets the telephony app’s stored states. Restart your phone after. Most of the time, that clears it.
If it still persists, the issue might actually be on the carrier’s side. The best test: remove your SIM and put it in another Android phone. If the icon shows up there too, call your carrier and ask them to reset your voicemail line server-side.
Visual Voicemail Not Connecting or Syncing
If your visual voicemail app says it can’t connect or shows an error, the first thing to check is your Wi-Fi. Turn it off. Seriously. Most carrier VVM apps need a direct cellular data connection and simply won’t authenticate over Wi-Fi.
If you’re already on mobile data and it’s still not working, check whether you have a VPN active. VPNs encrypt and reroute your data traffic, and carrier VVM apps often can’t punch through that. Disable the VPN temporarily, reload the app, and see if it connects. If it does, add the Phone and Voicemail apps to your VPN’s split-tunneling exclusion list so they always bypass the VPN going forward.
Deep System Issues: Clearing the Partition Cache
If nothing else is working and your voicemail is consistently misbehaving along with other app performance issues, there’s a last-resort fix that doesn’t delete any of your data: clearing the system partition cache from recovery mode.
Power off your device. Then hold the Power and Volume Up buttons simultaneously until the phone vibrates and shows the Android Recovery screen. Use the volume buttons to navigate to Wipe Cache Partition, press the power button to select it, confirm, and then reboot. This removes corrupted temporary system files and often clears stubborn app behavior issues.
Visual Voicemail Troubleshooter
Answer a few quick questions to resolve sync, alert, and connection issues
Before we begin — are these fundamentals verified?
Confirm: your device shows active cellular signal, mobile data is enabled, system date & time are automatic, and your carrier plan supports Visual Voicemail.
Let’s verify your baseline configurations
Verify these prerequisites:
- Enable mobile data (Visual Voicemail requires cellular data handshake)
- Ensure at least 1–2 bars of stable cellular voice signal
- Set Date & Time to “Automatic” in System Settings
- Confirm with your operator that VVM provisioning is active on your line
What symptom is your Visual Voicemail exhibiting?
Select the category that best describes your technical issue.
Are notification permissions granted for your Phone/VVM app?
Check: Settings > Apps > Phone (or Carrier VVM) > Notifications to verify all channels are active.
Enable notification delivery
Steps to re-enable VVM alerts:
- Navigate to Settings > Apps
- Select Phone (or your carrier’s VVM app)
- Tap Notifications and toggle all category switches to ON
- Ensure Battery Optimization is set to “Unrestricted” for the app
Leave a test voicemail from another line. Does it arrive?
Place a test call, leave a short voice message, and check for prompt delivery.
Notifications Active
Visual Voicemail alerts and message synchronization are operating normally.
Does the application display “Can’t connect” or load indefinitely?
Carrier VVM synchronization protocols authenticate via mobile data APNs rather than standard Wi-Fi.
Apply connectivity adjustments
Follow these network steps:
- Turn off Wi-Fi: Force initial authentication via direct cellular data
- Disable active VPNs: VPN tunnels frequently route around carrier VVM servers
- Toggle Airplane Mode ON for 10 seconds, then OFF
- Reboot the device and open the VVM client over mobile data
Connectivity Restored
Visual Voicemail is synced. If using a VPN, add Phone/VVM apps to your split-tunneling exclusion list.
Have you cleared the application cache & data?
Corrupted temporary data can cause playback failures, parsing stalls, or rendering glitches.
Clear application cache store
Steps to clear VVM cache:
- Go to Settings > Apps > Phone (or Carrier VVM)
- Tap Storage & cache
- Select Clear Cache, then Clear Storage (this will not delete personal contacts)
- Reboot the device and relaunch the application
Is Visual Voicemail functioning after the reset?
Application Restored
Flushing corrupted local app cache successfully re-established normal mailbox operations.
Execute advanced system remedies
Perform these deeper steps:
- Check Settings > System > Software update for pending OS patches
- Reseat your physical SIM card or toggle your eSIM profile OFF and ON
- Reset Network Settings under Settings > System > Reset options
- Contact your carrier support desk to request an automated voicemail provisioning reset
Provisioning Restored
Network parameters and account line provisioning are synchronized.
Quick Carrier Reference
Here’s a fast lookup for setting up voicemail by carrier:
Verizon – Dial *86 to access voicemail. Download the Verizon Visual Voicemail app for inbox view. Visit the Verizon Support Portal for more.
AT&T – Long-press 1 to set up. Download the AT&T Visual Voicemail app or use the Google Phone app if supported. See AT&T’s voicemail guide.
T-Mobile – Long-press 1 to start setup. The T-Mobile Visual Voicemail app is available on the Play Store. Check T-Mobile Support for detailed help.
Google Fi – Everything is managed directly inside the Google Phone app. No separate setup needed.
Airtel / Vodafone / BSNL (India) – Long-press 1 to initialize. Visual voicemail is integrated into the default dialer on most devices.
Final Thoughts
Voicemail on Android has come a long way. What used to be a clunky dial-in experience has evolved into smart, on-device AI-powered transcription that lets you read a caller’s message as they’re leaving it.
Whether you’re just getting started with basic voicemail, upgrading to visual voicemail for the first time, or exploring Samsung Direct Voicemail on a newer Galaxy device, the setup is genuinely manageable once you know which system you’re working with.
Start with the long-press on 1 if you just need something working fast. Move to visual voicemail for a better daily experience. And if you’re on a compatible Samsung device, Direct Voicemail is worth trying at least once.
Voicemail on Android: Frequently Asked Questions
Everything you need to know about setting up, using, and troubleshooting carrier voicemail, Visual Voicemail, and on-device features.
Setup & Basics
How do I set up voicemail on my Android phone for the first time?
- Create a security PIN (usually 4–15 digits)
- Record your name verification
- Set up your custom personal greeting
What if long-pressing 1 on the dial pad doesn’t work?
- Open the Phone app > tap the three-dot menu > Settings
- Go to Voicemail > Advanced Settings > Setup > Voicemail Number
- Enter your carrier’s designated access number and tap OK
What is the default voicemail PIN on Android?
Visual Voicemail
What is Visual Voicemail and how does it function?
Why does Visual Voicemail fail to sync over Wi-Fi?
Samsung & Call Forwarding
What is Samsung Direct Voicemail?
How do I clear a persistent voicemail notification icon?
Can Google Voice handle voicemail forwarding on Android?
- T-Mobile:
**004*[Your Google Voice Number]#(Disable:##004#) - Verizon:
*71[Your Google Voice Number](Disable:*73) - AT&T:
*61*[Your Google Voice Number]#(Disable:##61#)