

If you’re locked out of your Windows laptop after typing your password wrong one too many times, don’t panic: forgetting your Windows login almost never means losing your files. Your password and your stored data are handled by completely separate systems, so in the vast majority of cases you can get back in without touching a single photo, document, or file.
This guide covers both Windows 10 and Windows 11, both Microsoft accounts and local accounts, the difference between a forgotten password and a forgotten PIN, what to do if you don’t have a second admin account or reset disk, and which third-party “instant password remover” tools are worth avoiding. It also flags upfront, clearly, where these fixes genuinely cannot help, so you’re not chasing a workaround that doesn’t exist for your situation.
A quick note before we start: everything in this guide assumes you’re trying to get back into a device that’s actually yours, or one you’re authorized to manage (like a family member’s laptop they’ve asked you to help with). These are legitimate, well-documented Windows recovery features, not a way to break into someone else’s computer, and some of them simply won’t work on a device that isn’t yours, by design.
Why Losing Your Password Doesn’t Mean Losing Your Files
Before we jump into the fixes, it helps to understand why this works, because it’ll make the steps below feel a lot less risky.
Windows keeps two very different things separate: your login credentials and your actual stored data. Your password is checked against a small authentication record. Your documents, pictures, downloads, and installed programs live in a completely different part of the system. Unless someone deliberately formats your drive, or you’re locked out by encryption without a recovery key, resetting your password doesn’t touch your files at all.
The exact method you’ll need depends on two things: whether your laptop uses a Microsoft account (the kind you sign in with an email address) or a Local account (no email required at sign-in), and whether BitLocker drive encryption is switched on. The steps below will help you figure out which situation you’re in.
Password vs PIN: Why This Distinction Matters
A lot of people say “I forgot my Windows password” when what they actually mean is they forgot their PIN, and the fix for each is quite different, so let’s clear this up first.
- Your password is the master credential for your account. If it’s a Microsoft account, it’s verified against Microsoft’s servers online. If it’s a local account, it’s verified against a file stored on your own machine.
- Your PIN, by contrast, is tied only to that one specific device. It’s part of Windows Hello, and it’s secured by a chip on your motherboard (the TPM, or Trusted Platform Module), not by Microsoft’s servers.
That’s actually why a PIN can be more secure for daily use than a password, even though it’s usually just four to six digits it physically cannot be used anywhere except on that one laptop.
The practical difference for you right now: if you’ve forgotten your PIN but still remember your password, fixing it takes about two minutes (jump to that section below). If you’ve forgotten your actual account password, that’s the bigger job, and it’s what most of this guide covers.word, fixing it takes about two minutes (jump to that section below). If you’ve forgotten your actual account password, that’s the bigger job, and it’s what most of this guide covers.
Step 1: Figure Out What Type of Account You Have
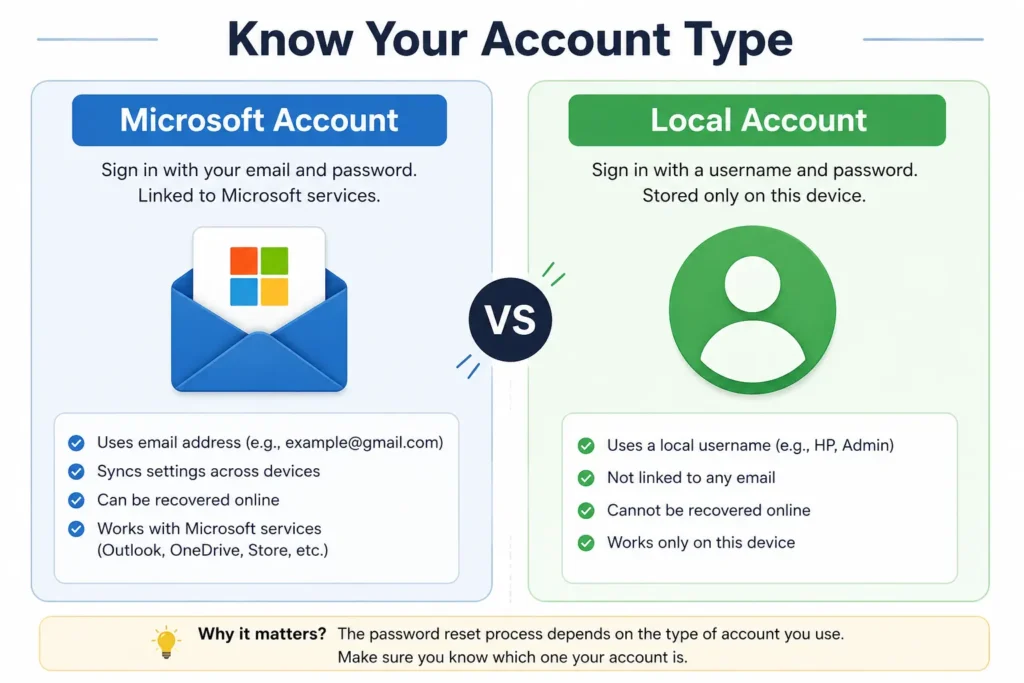
- Microsoft Account: you sign in with an email address (like something ending in @outlook.com, @hotmail.com, or a custom domain linked to Microsoft). This account is managed in the cloud.
- Local Account: you sign in with just a username, no email involved. This lives entirely on your machine, inside a system file called the SAM registry.
- Domain Account: a less common third case. If your laptop was set up by an employer and connects to a company network, you’ll need your IT department, since domain-joined machines usually block personal bypass methods on purpose (and that’s a good security feature, not a flaw).
Windows 10 vs Windows 11 tip: on Windows 11 Home, Microsoft requires an internet connection and a Microsoft account during initial setup for most new laptops, so if your device is fairly recent, there’s a good chance you’re on a Microsoft account. Windows 10 laptops, especially older ones, are far more likely to be running on a local account.
If you genuinely aren’t sure which one you have, try Method 1 below first. If it doesn’t apply to your sign-in screen, you’re dealing with a local account, and Method 2 is where you’ll want to go.
Method 1: Resetting a Microsoft Account Password (Cloud-Based Reset)
This is the easiest scenario to fix, even though it doesn’t feel that way when you’re staring at a locked screen. It works the same way on Windows 10 and Windows 11, since the account itself lives online, not on your laptop.
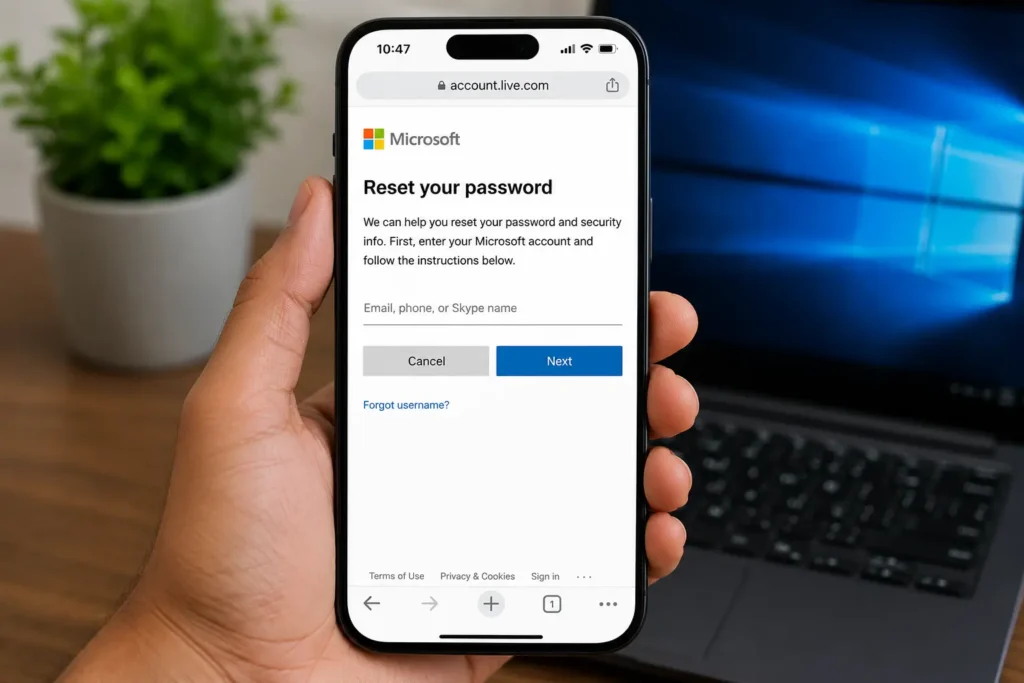
- On a different device (phone, another computer), open a browser and go to account.live.com/password/reset.
- Enter the email address or phone number linked to your locked account.
- Choose how you want to verify your identity a code to a backup email, an SMS, or an authenticator app.
- Enter the verification code, then create a new password.
- Go back to your locked laptop. Before typing your new password, check the Wi-Fi icon on the lock screen and make sure you’re connected to the internet your laptop needs to reach Microsoft’s servers to confirm the new password.
- Type your new password into the sign-in field and hit enter. Every file will be exactly where you left it.
Two things worth knowing:
If you get hit with repeated failed attempts and see a lockout message, don’t keep hammering the login button. Leave the laptop plugged in and powered on for 30 minutes to a couple of hours to let the security delay clear, then try your new password again.
If your laptop was offline when you changed the password, reconnect to Wi-Fi directly on the lock screen itself that usually forces Windows to check with Microsoft immediately, rather than waiting.
Method 2: Resetting a Local Account Password Without Losing Data
If you’re using a local account, Windows gives you a few built-in options, and these work the same way on Windows 10 and Windows 11.
Using Your Security Questions
If you set up your local account on Windows 10 (version 1803 or newer) or Windows 11, you were likely asked to answer three security questions during setup.
- Type in any incorrect password on your lock screen.
- Click the “Reset password” link that appears below the password field.
- Answer your three security questions exactly as you originally did (case usually doesn’t matter, but be precise with the words).
- Set a brand-new local password and confirm it.
The one catch: if your account was created on an older build of Windows 10 (before version 1803), this option may not exist, since security questions weren’t offered back then. If you don’t see a “Reset password” link, move on to the next option.1803), this option may not exist, since security questions weren’t offered back then. If you don’t see a “Reset password” link, move on to the next option.
Using a Password Reset Disk
If you created a Password Reset Disk (a USB drive) in the past, this is your fastest route.
- Plug the USB drive into your laptop.
- Enter any wrong password, click “Reset password,” and follow the wizard.
- Select the USB drive, then set a new password on the spot.
If your laptop doesn’t detect the USB drive at all, that’s a separate (and surprisingly common) issue see the full troubleshooting guide here: fixmydaily.com/fix-usb-device-not-recognized
If you haven’t made a reset disk yet, do it the moment you’re back in Control Panel > User Accounts > Create a password reset disk. Takes about two minutes and can save you a headache down the line.oment you’re back in Control Panel > User Accounts > Create a password reset disk. Takes about two minutes and can save you a massive headache down the line.
Using a Second Administrator Account
If there’s another account on the same laptop with administrator rights:
- Sign into that account.
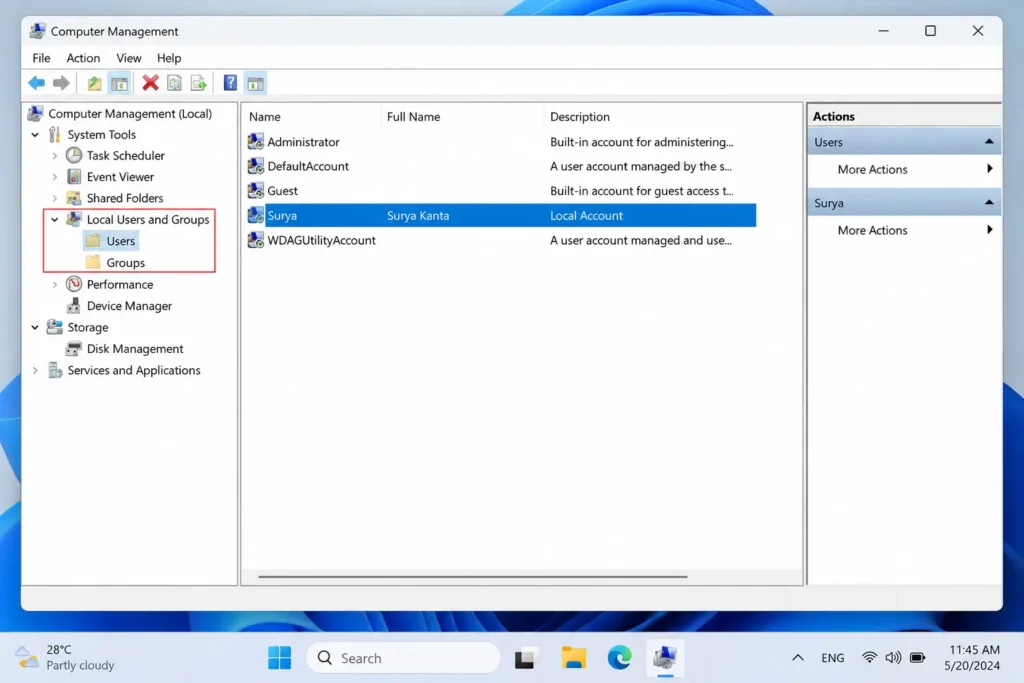
- Press Win + X, choose Computer Management.
- Navigate to System Tools > Local Users and Groups > Users.
- Right-click your locked account, choose Set Password.
- Click through the warning about losing saved web credentials, and set a new one.
What If You Don’t Have Any of These?
If you have no security questions set up, no reset disk, and no second admin account on a local-account device, Windows doesn’t offer a safe, built-in way to recover the account password itself without one of the options above. This is a common situation, especially on laptops set up years ago or handed down from someone else and it’s worth being upfront about rather than promising a shortcut that doesn’t exist.
At this point, your realistic options are:
- Contact Microsoft Support or a certified technician, who can advise on options specific to your device and warranty status.
- Use “Reset this PC” (Settings > Update & Security > Recovery, or from the locked sign-in screen via Advanced options if you can reach it). Choosing “Keep my files” removes apps and settings but preserves your personal files in most cases; “Remove everything” wipes the drive entirely. This isn’t guaranteed to work if the drive is encrypted and you can’t unlock it, and “Keep my files” can still occasionally fail depending on how your Windows installation was set up, so it’s a fallback, not a first choice.
- Rescue your personal files first using the WinRE method further down this guide, before reinstalling this doesn’t reset your password, but it can get your files off the drive if a reinstall becomes unavoidable.
The one honest caveat: none of these paths help if the drive is protected by BitLocker without the recovery key, or if it’s a company-managed domain device with extra restrictions in place. Both are covered below.
What If BitLocker Is Blocking You?
This is the one situation where things can get genuinely stuck, and it’s better to be straightforward than pretend there’s always a workaround. Many newer laptops, including plenty of Windows 11 Home devices, ship with BitLocker (or Device Encryption) switched on by default. If BitLocker is active, none of the offline methods above can read or modify your drive without the 48-digit recovery key. There is no legitimate way around this that’s the entire point of the feature.
The good news: this key is very likely saved already, especially if you signed into your laptop with a Microsoft account at any point. Check from another device at account.microsoft.com/devices/recoverykey.
If you genuinely can’t locate the key and BitLocker is active, a full reinstall becomes the only path forward for that device and yes, that generally means the existing files stay inaccessible. This is exactly why it’s worth writing your BitLocker key down somewhere physical the moment you set up a new laptop.
Forgot Your PIN Instead of Your Password?
If it’s specifically your PIN you can’t remember, and you still know your account password, this is a much quicker fix you don’t need any of the recovery methods above.
- On the sign-in screen, below the PIN box, click “I forgot my PIN.”
- Windows will ask you to verify your identity using your account password instead.
- Once verified, set a brand-new PIN immediately.
You can also get here proactively any time you’re signed in, through Settings > Accounts > Sign-in options > PIN (Windows Hello).
The one situation this doesn’t help with: if you’ve forgotten both your PIN and your password. In that case, fix the password first using Method 1 or Method 2, and your PIN can then be reset from Settings.
When You Should Avoid Third-Party Password-Reset Software
If you’ve searched around for this problem before landing here, you’ve probably seen dozens of tools promising to “instantly remove” or “bypass” your Windows password. Here’s what to watch out for:
- Tools that ask you to disable your antivirus or Windows Defender before running. A major red flag, and a common trick to slip malware onto your machine while your protection is off.
- “Free” downloads from ad-heavy or unfamiliar sites, especially ones bundling extra installers you didn’t ask for. Password-recovery searches are a favorite target for bundled adware.
- Tools or “online services” asking you to upload a disk image or connect your laptop to their servers. There’s no good reason a legitimate local reset needs your data leaving your machine.
- Anything demanding payment upfront before showing you whether it even worked.
- Claims that a tool can bypass BitLocker or a Microsoft account entirely without any recovery key or credentials. That’s simply not how the underlying security is designed to work these tools only ever touch the local account database, and can’t reach a cloud-verified Microsoft account password at all.
There are legitimate offline tools IT professionals use, usually Linux-based bootable USB utilities that edit the local account database directly. Functionally, they’re not doing anything beyond what Windows’ own built-in recovery tools already let you do for free, and they carry real risk if used incorrectly (including permanently locking you out further). Exhaust the built-in Windows methods in this guide first, and involve a professional if you go this route.inux-based bootable USB utilities that edit the same local SAM database Method 3 touches. But functionally, they’re not doing anything beyond what Windows’ own built-in recovery environment already lets you do for free. My honest recommendation: exhaust the built-in Windows methods in this guide first.
Rescuing Your Files If You Can’t Reset the Password at All
Every now and then, none of the above works maybe it’s a work laptop with domain restrictions, or BitLocker with a missing key alongside a locked account. In these rarer cases, you can often still rescue your personal files before reinstalling Windows, using a trick with Notepad. This doesn’t reset or bypass your password it uses Windows’ built-in recovery environment, which is accessible without signing in by design, purely to copy files off the drive.
Getting into Windows Recovery Environment (WinRE):
- From the lock screen, hold Shift and click Restart from the power icon (if you can reach it), or
- Interrupt the normal boot process three times in a row by holding the power button during startup Windows will automatically drop into recovery mode, or
- Boot from a Windows installation USB or recovery drive and choose “Repair your computer.”
Once you’re in WinRE:
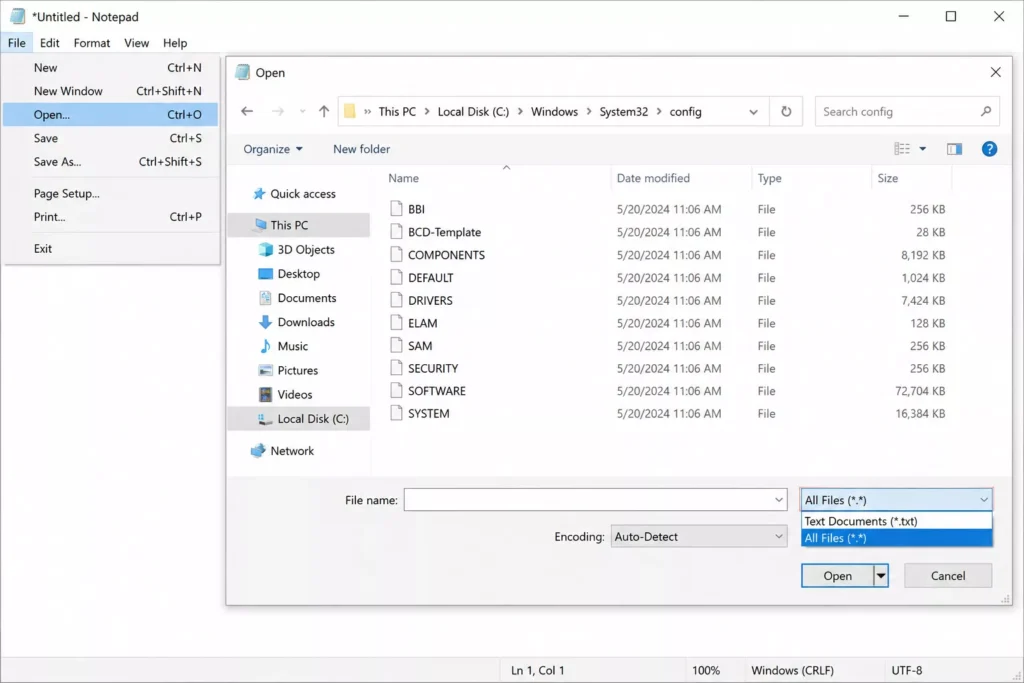
- Go to Troubleshoot > Advanced options > Command Prompt.
- Plug in an external USB drive. (If it isn’t showing up, the USB troubleshooting guide covers common fixes for that too.)
- Type
notepad.exe - In Notepad, go to File > Open, and switch the file type dropdown from “Text Documents” to “All Files.” This turns Notepad into a basic file browser.
- Click This PC, navigate to
C:\Users\YourUsername, and you’ll see your Desktop, Documents, Pictures, and Downloads folders. - Right-click to copy them, then paste them onto your external drive.
It won’t show a progress bar, so give it time and press F5 periodically to check the file size on your USB drive is growing.
This trick only works if the drive isn’t BitLocker-encrypted without its key. If it is, the files remain unreadable by design.able by design.
What Actually Happens to Your Files: A Method-by-Method Breakdown
| Method | What happens to your files |
|---|---|
| Microsoft account reset | Completely safe nothing on your drive is touched |
| Security questions / reset disk | Completely safe only replaces the password hash |
| Second admin account reset | Safe for files; you may lose saved Wi-Fi passwords or browser auto-fill logins tied to the old password |
| Reset this PC Keep my files | Personal files generally preserved; apps and settings are removed, and results can vary by installation |
| Reset this PC Remove everything | All data erased use only as a last resort |
| BitLocker without recovery key | Not safe to assume anything drive stays encrypted and unreadable |
Preventing This From Happening Again
Once you’re back into your laptop, it’s worth spending ten minutes setting yourself up so this never turns into a crisis again:
- Create a password reset disk through Control Panel if you’re on a local account.
- Double-check your BitLocker recovery key is backed up to your Microsoft account.
- Set up a PIN through Windows Hello for quicker sign-ins, but keep your underlying password saved somewhere secure, like a password manager.
- Consider a second administrator account with a different, memorable password, just as a safety net it costs nothing to set up and can save you from a full reinstall later.
Related guides:
How to find saved Wi-Fi passwords on Android
Frequently Asked Questions
Will resetting my local Windows password delete my files?
No. A local password reset — whether through security questions, a reset disk, or a second admin account — only replaces the password hash used to verify your login. Your documents, pictures, and installed programs are stored separately and aren’t touched.
What if BitLocker is on and I don’t have the recovery key?
Then none of the offline reset methods in this guide can access the drive. BitLocker is designed so there’s no workaround without the 48-digit recovery key. Check account.microsoft.com/devices/recoverykey first — it’s often saved there automatically. If it truly can’t be found, a full reinstall is the only path forward, and the existing files will stay inaccessible.
Can the Utilman command prompt trick reset a Microsoft account password?
No. That technique, and similar offline account-database editing tools, can only modify the local account database stored on your machine. A Microsoft account’s password is verified against Microsoft’s servers, not a local file, so offline tools like this can’t touch it at all.
How do I get into Windows Recovery Environment if my desktop is completely locked?
Hold Shift and click Restart from the lock screen’s power icon, or interrupt startup three times in a row to trigger automatic repair, or boot from a Windows installation USB and choose “Repair your computer.” From there you can reach Troubleshoot > Advanced options > Command Prompt.
What’s the difference between resetting my password and resetting my PIN?
Your password is your account’s master credential, checked either online (Microsoft account) or against a local file (local account). Your PIN only works on that one device and is verified by your TPM chip, not Microsoft’s servers — so resetting a PIN requires your password, while resetting a password requires one of the recovery methods in this guide.
I forgot my PIN, do I need to go through the whole password reset process?
No — if you still remember your account password, click “I forgot my PIN” on the sign-in screen, verify with your password, and set a new PIN in under two minutes.
Does this guide work the same way on Windows 10 and Windows 11?
Yes, all the methods above apply to both versions. The main practical difference is that Windows 11 Home more often defaults to a Microsoft account, since Microsoft requires one during setup on most new devices, while older Windows 10 installs are more likely to be local accounts.
Is it safe to download free “Windows password recovery” software?
Not always. Many are bundled with adware or ask you to disable your antivirus first, which is a red flag. Stick to Windows’ own built-in recovery methods first, and treat any tool asking for upfront payment or your data to be uploaded with real suspicion.
Can every Windows password be bypassed without any credentials at all?
No. BitLocker-encrypted drives without the recovery key, Microsoft account passwords, and domain-joined enterprise devices are all specifically designed to resist offline bypass. Claims otherwise from third-party tools aren’t accurate.
Final Thoughts
Getting locked out of your own laptop is genuinely stressful, especially when you’re not sure if years of photos or important documents are still safe. In the overwhelming majority of cases, the outcome is the same: your files are fine, and getting back in just takes patience and the right method for your specific situation whether that’s a forgotten password, a forgotten PIN, or a mix of both.
Take it one step at a time, double-check which account type you’re dealing with, don’t rush the more technical steps, and steer clear of shortcuts from unfamiliar software.