

How to Find Saved Wi-Fi Passwords on Android
If your Android phone is already connected to a Wi-Fi network, the password is stored on the device you just need to know where Android hides it. That’s not always obvious, because the exact steps differ by phone brand. Samsung works differently from Xiaomi, a Pixel works differently from a Motorola, and depending on whether you’re on Android 12 or Android 16, a couple of menu labels shift around too.
This guide covers every method for every major Android version and every popular brand, so whether you’re a homeowner who forgot the Wi-Fi password, someone helping a colleague connect, or dealing with a phone that won’t show the “Share” button, you’ll find the right steps below.
Why You Might Need Your Saved Wi-Fi Password
There are so many situations where this becomes important. Maybe you’re setting up a brand new phone and working through the whole checklist in one sitting. Maybe a guest is visiting. Maybe your router just got reset and you need to reconnect everything. Or maybe your SIM card suddenly stopped being detected and you’re leaning on Wi-Fi until that’s sorted out, or your phone is randomly showing “Emergency calls only” and Wi-Fi is the only thing keeping you connected. Or maybe someone simply asks and you realize you have absolutely no idea what the password is.
The good news? If your Android phone is already connected to that Wi-Fi network, the password is stored right there on your phone. You just need to know where to look, and that’s where most people get stuck, because the steps look completely different depending on your phone’s brand.
What Android Version Are You Running? (Check This First)
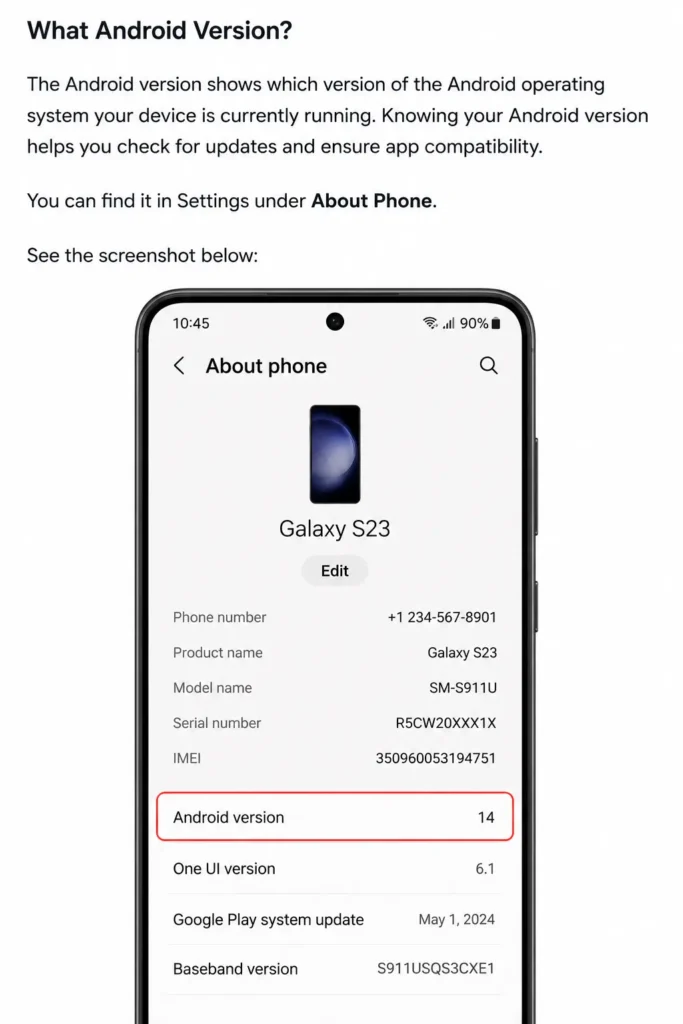
Before anything else, check which version of Android your phone is running. This matters because the method is different depending on your version.
Go to Settings > About Phone > Android Version. If your phone runs Android 10 or higher, you’re in luck Google made it much easier to view saved Wi-Fi passwords without any technical tricks. If you’re on Android 9 or older, things are a bit more complicated and I’ll cover that too.
Does This Work on Android 10, 11, 12, 13, 14, 15, and 16?
Here’s some good news before we go any further: the core method hasn’t really changed since Google first introduced it. Every version from Android 10 through Android 16 uses the same basic idea tap your network’s settings, tap Share, verify it’s you, and the password shows up under a QR code. You don’t need a different guide for every version.
What does change, slightly, from one release to the next is cosmetic:
- On Android 10 to 12, the settings screen is usually labelled “Network & internet,” with “Internet” as a sub-item.
- On Android 13 to 16, most phones just show “Internet” as the main entry, and it opens straight to your list of networks.
- Android 12 and 13 also added a “Nearby Share” option next to the QR code, so you can beam the password straight to a friend’s phone or Chromebook without them scanning anything at all.
- On Android 16, the whole process is still just two taps deep from the Wi-Fi settings screen, so if anything, it’s gotten faster, not more complicated.
So don’t worry about hunting for a “how to do this on Android 14” guide versus an “Android 15” one. If you’re on Android 10 or newer, the method below works for you. If you’re on Android 9 or older, skip ahead to the section for older phones, because your phone won’t have this feature built in at all.
The Built-In Method (Works on Android 10 Through Android 16)
This is the easiest method and works on the vast majority of modern Android phones, regardless of brand, as long as you’re on Android 10 or above.
Go to Settings, then tap Network & Internet (or just Internet on newer versions). You’ll see your current Wi-Fi network listed there. Tap the little gear icon next to it, then tap the Share button.
Your phone will ask you to verify your identity this could be your fingerprint, face unlock, or PIN. This is just Android making sure no one else sneaks a peek at your password. Once you authenticate, a QR code appears on screen, and right below it, your Wi-Fi password is shown in plain text.
That’s it. Simple as that.
If you want to see passwords for networks you connected to before, not just the current one, scroll down on that same Internet screen and tap Saved Networks. You’ll see a list of every Wi-Fi network your phone has ever connected to. Tap any one of them, hit Share, verify yourself, and done.
For Google’s own reference on this feature, see the official Android Wi-Fi guide.
Wi-Fi Password Steps by Phone Brand
The method above is the “official” Android way, but the exact menu names and icons shift depending on who made your phone. Here’s the breakdown for the brands I get asked about the most.
Google Pixel
Pixel phones run the closest thing to “stock” Android, so this is really the reference version of the method above. Go to Settings > Network & internet > Internet, tap the gear icon next to your connected network, tap Share, and authenticate with your fingerprint or PIN. The password appears in plain text under the QR code.
Because Pixel is Google’s own hardware, it’s usually the first phone to get any new tweaks, like Nearby Share for Wi-Fi, before other brands catch up. If a new Android version changes anything, it shows up on Pixel first.
Samsung Galaxy (One UI)
Samsung phones run their own skin called One UI, so the steps look a little different from stock Android. Which version you have matters here.
One UI 6 and 7 (Android 14 to 15, and newer):
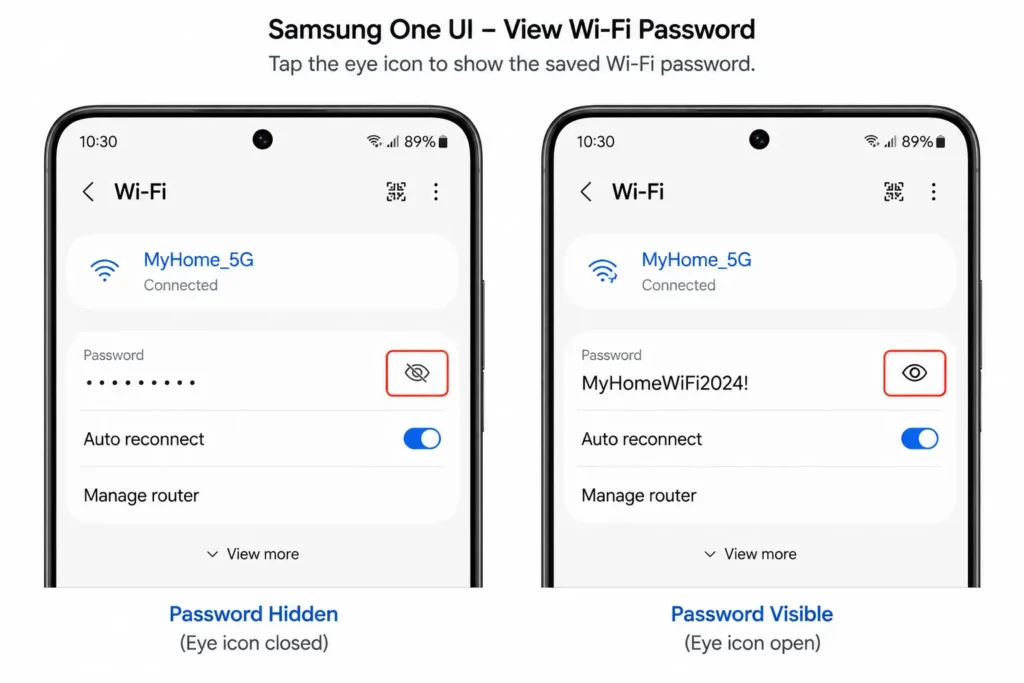
Go to Settings > Connections > Wi-Fi. For the currently connected network, tap the gear icon next to the network name. You’ll see the password hidden behind dots or asterisks. Right next to that masked password, there’s a small eye icon with a line through it. Tap it, verify with fingerprint or PIN, and the password appears in plain text.
For networks you’ve connected to before, tap the three-dot menu in the top right corner, then go to Advanced Settings or Intelligent Wi-Fi, then Manage Networks. Same process from there tap the network, find the masked password, unmask it with the eye icon.
Older Samsung phones (One UI 2 through 5):
The direct password view isn’t available for saved networks on these. But there’s still a workaround. While connected to a network, tap the QR Code button at the bottom of the network details screen. Save that QR image to your gallery, then scan it using Google Lens or any QR scanner. The full password will be embedded in the QR code data. This takes a few more steps than the direct password view, but it works on older One UI versions that don’t show the password directly.
One thing worth flagging here: on some Samsung and carrier-branded builds, the plain-text password line simply doesn’t appear at all, even after you authenticate you only get the QR code. That’s not a bug on your end. I cover why that happens, and what to do about it, in the troubleshooting section below.
Motorola
Motorola runs one of the closest-to-stock Android experiences out there, which makes this one genuinely easy. Go to Settings > Network & Internet > Internet (or long-press the Wi-Fi icon in your Quick Settings panel), tap the connected network, tap Share, and verify your identity. The password shows up under the QR code, exactly like on a Pixel.
Xiaomi, Redmi, and POCO (MIUI / HyperOS)
If you’re on a newer Xiaomi phone running HyperOS, the process is almost identical to stock Android. Go to Settings > Wi-Fi, tap the active network, and you’ll see a QR code along with the password shown in plain text below it.
On older MIUI phones where the password stays hidden, here’s a workaround worth trying. Take a screenshot of the QR code screen, then open Xiaomi’s built-in Scanner app. Tap the gallery icon inside the scanner, load the screenshot you just took, crop it so only the QR code is visible, and let the app scan it. The password shows up, sometimes still masked, but one more tap on the asterisks reveals it.
It’s a bit roundabout, but it’s a reliable fallback when the password field stays hidden.
OnePlus
Go to Settings > Wi-Fi and tap the information icon (the little “i” in a circle) next to your connected network. You’ll see a Share option that brings up the QR code and password combo.
For saved networks, tap the three-dot menu in the corner, then go to More Settings or Advanced Settings, and look for Saved Networks. Tap any network, hit Share, verify your identity, and the password appears right below the QR code.
Realme
Realme phones run Realme UI, which is built on a similar foundation to OPPO’s ColorOS, so if you’ve used either of those brands, this will feel familiar. Go to Settings > Wi-Fi, tap the gear or info icon next to your connected network, and tap Share Password or the QR code icon. Authenticate, and the password appears below the code.
For older Realme UI versions, the option sometimes sits one level deeper, under Advanced or Saved Networks, on the same Wi-Fi settings screen. If you don’t see it immediately, check there before assuming your phone doesn’t support it.
Using the Wi-Fi QR Code
I want to slow down on this one, because the QR code isn’t just a nice extra it’s genuinely one of the most useful parts of this whole feature, and understanding what it actually does makes everything else in this guide click into place.
That QR code isn’t a random image. It’s a small text file encoded visually, following a standard format that stores your network’s name (SSID), its security type (like WPA2 or WPA3), and the password itself, all packed into a pattern a camera can read instantly. This format was built by the Wi-Fi Alliance, the same industry group responsible for the Wi-Fi standard itself, as part of what’s called the Wi-Fi Easy Connect protocol.
That’s why it’s so useful in two very different situations:
Connecting someone else’s device without typing anything. If a friend or guest needs your Wi-Fi, you can simply show them the QR code from your phone’s screen. They open their camera app (or a QR scanner if their phone is older), point it at the code, tap the notification that pops up, and they’re connected. No typing, no spelling out random characters, no risk of a typo.
Recovering the password as plain text, if your phone hides it. As you’ve seen in a few of the brand-specific sections above, some phones only show you the QR code and skip the plain-text line underneath it. When that happens, take a screenshot of the QR code, then open it in Google Lens, either through the Google Photos app or by tapping the Lens icon in the Google search bar’s camera button. Lens will decode the image and show you the exact text stored inside it, including the password, in a readable line you can copy or read aloud.
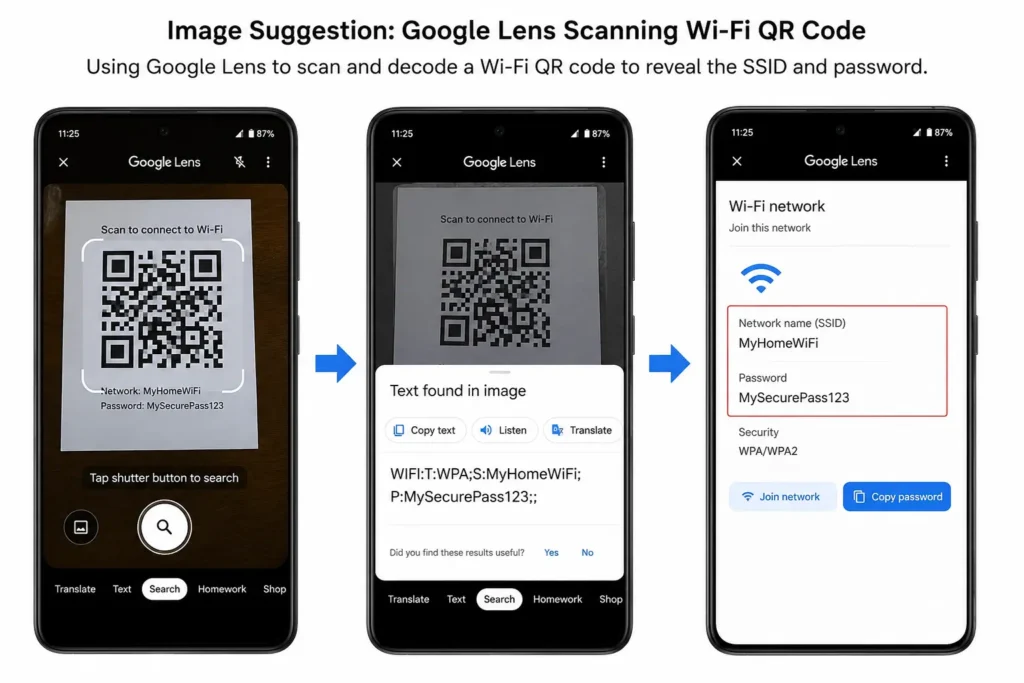
A quick real-world tip: if you’re doing this for a guest who’s standing right in front of you, just have them scan the QR code directly off your screen instead of screenshotting anything. It’s faster, and it means the password itself is never actually shown or copied anywhere.
What If the Wi-Fi Password Option Isn’t Showing? {#password-not-showing}
This is one of the most common messages I get after publishing guides like this one: “I followed every step, but there’s no Share button at all.” If that’s you, don’t assume your phone is broken. There are a handful of specific, well-understood reasons this happens.
You’re on an enterprise or 802.1x network. If you’re trying this on office Wi-Fi, a college network like eduroam, or anything that asked you to log in with a username and domain rather than a simple password, Android deliberately hides the sharing option. These networks don’t use one shared password at all each person authenticates with their own credentials, so there’s genuinely nothing for Android to package into a QR code. This isn’t a glitch, it’s intentional. If you need access on another device, you’ll need to go through your IT department or network administrator.
Your phone doesn’t have a screen lock set up. Android requires a PIN, pattern, fingerprint, or face unlock before it will reveal a saved password that’s the whole point of the authentication step. If your phone has no lock screen at all, the Share option can be missing or greyed out entirely. Setting up even a simple PIN, even temporarily, usually fixes this.
The network was never actually joined, just saved or typed in. Occasionally a network gets added to your list without your phone ever fully connecting and caching the credential in a shareable format for example, if it was pushed from a backup or added manually but the connection failed. In that case, there’s no valid password stored to share yet.
Your phone is on a managed work profile. If your phone was set up by your employer through a mobile device management (MDM) tool, IT admins can specifically block Wi-Fi password sharing as a company security policy. This is common on managed devices, and there’s no user-side workaround for it.
Your phone’s manufacturer intentionally hides the plain-text line. As mentioned earlier, a few Samsung and carrier-customized builds only ever show the QR code, never the typed-out password, as an extra security layer. If that’s your situation, the Google Lens trick covered above will get you the text version.
You’re running Android 9 or older. The share feature simply doesn’t exist on these versions. Jump to the older Android section below for your options there.
How to View All Saved Wi-Fi Passwords at Once (Without Root)
What if you want to see all your saved Wi-Fi passwords in one place, not just one at a time? There’s a method for that too, and it doesn’t require rooting your phone.
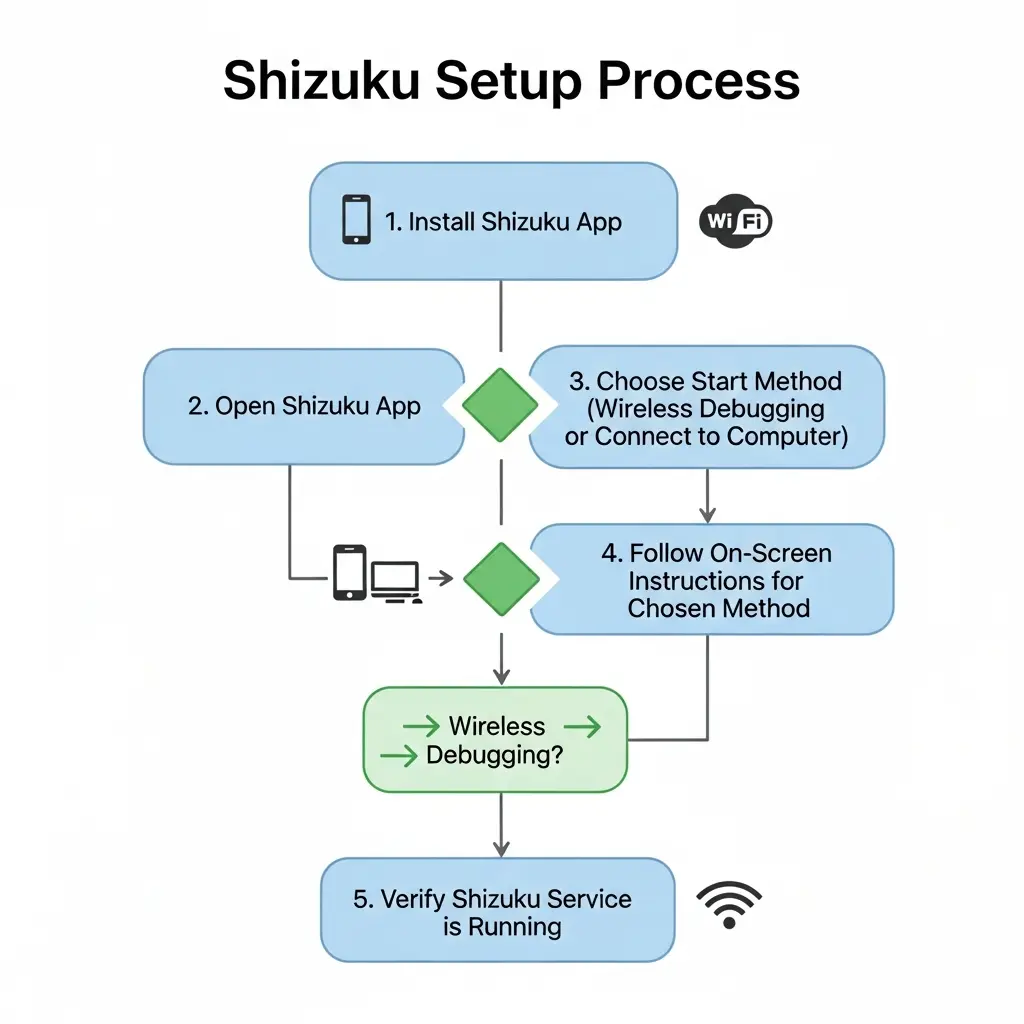
This uses a tool called Shizuku combined with an app called WiFiList. It sounds technical, but I’ll explain it simply.
Shizuku is an app that allows other apps to use system-level permissions that are normally restricted. On Android 11 and above, Google actually allows the system’s “shell” user to access Wi-Fi passwords Shizuku just makes that accessible without needing full root access.
Here’s the basic flow:
First, you need to enable Developer Options. Go to Settings > About Phone and tap Build Number seven times. You’ll see a message saying “You are now a developer.”
Then go to Settings > System > Developer Options and enable Wireless Debugging. Your phone must be connected to Wi-Fi for this to work.
Download both Shizuku and WiFiList from the Google Play Store Shizuku is free, WiFiList is a small one-time paid app. Open Shizuku, tap Pairing, and follow the on-screen steps using the Wireless Debugging pairing code. Once Shizuku is running, open WiFiList, grant it permission to use Shizuku, and it will show you every saved Wi-Fi network on your phone along with its password.
You can even export the list as a CSV file, great for backing up your credentials or migrating to a new phone.
Recovering Wi-Fi Passwords via ADB (Rooted Devices Only)
Android restricts direct access to the file where Wi-Fi credentials are stored. On a standard, non-rooted phone, even a connected ADB session can’t read it Google locked that down deliberately to protect saved passwords. Pulling credentials this way only works if the device itself has already been rooted.
If you’re an IT professional or repair technician working on a rooted device you own or have explicit authorization to service, a root ADB shell can read the configuration file directly using standard Android debugging tools. Because this requires root access, and because the same approach could technically be pointed at any device where USB debugging has been left enabled, only use it on hardware you own or have clear permission to work on.
For most readers managing their own non-rooted phone, the Shizuku + WiFiList method above is the safer, no-root way to see every saved password at once.
How to Find Wi-Fi Password on Older Android Phones (Android 9 and Below) {#older-android}
If you’re using an older phone Android 9 Pie, Android 8 Oreo, or earlier the built-in options above won’t work. These older Android versions didn’t include the native password sharing feature at all.
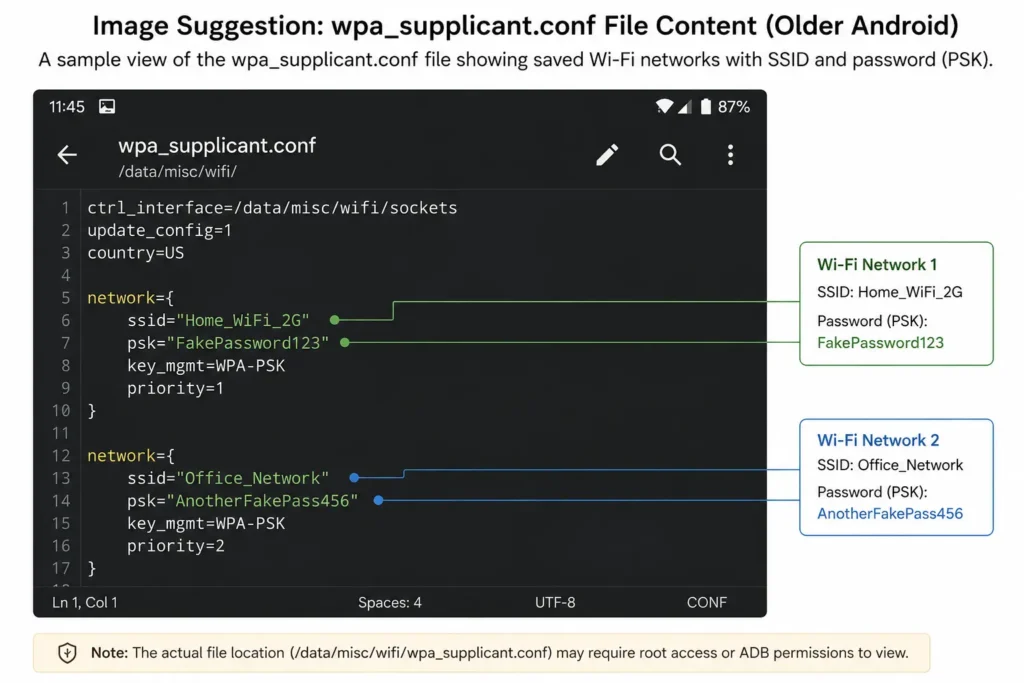
To view Wi-Fi passwords on these devices, you typically need root access. Rooting means giving yourself administrator-level access to your phone’s system files.
Once rooted, you can use apps like WiFi Key Recovery or WiFi Password Show from the Play Store. These apps ask for root permission, then read the configuration files directly and display all saved Wi-Fi passwords in a list. Only install root-access apps from reputable developers with verified reviews granting root permission to a low-quality or malicious app can expose more than just your Wi-Fi credentials.
Alternatively, with root access and a file manager that supports root browsing (like Solid Explorer or MiXplorer), you can navigate directly to the Wi-Fi configuration file in your phone’s system data folder, open it in a text editor, and look for the network name and password entries.
I want to be clear here rooting a phone voids its warranty and carries some risk if done incorrectly. If your phone is still under warranty or you’re not sure what you’re doing, stick to the non-root methods for newer Android versions.
Keeping Your Wi-Fi Password Safe
Now that you know how easy it is to retrieve a Wi-Fi password, it’s worth thinking about security for a moment. A few things to keep in mind:
When you share your Wi-Fi via QR code, that image contains your full password. If someone screenshots it and stores it in an unprotected cloud album, your password is exposed. Be mindful about who you share it with and where those screenshots end up.
Turn off USB debugging when you don’t actively need it leaving it enabled by default is one of the most common ways saved credentials get exposed on a lost or borrowed device.
Also, many home routers still have WPS (Wi-Fi Protected Setup) enabled by default. This feature has a known security weakness the PIN used can be cracked in as little as an hour using brute force. Log into your router settings and disable WPS if you haven’t already. Your internet provider can usually help you with this, and for general home network hardening, the Wi-Fi Alliance’s own guidance on WPA3 is worth a look if your router supports it.
Quick Summary: Which Method Should You Use?
If you’re on Android 10 through 16, on any brand, start with the built-in Settings > Wi-Fi > Share method. It’s the easiest and most secure way, and it takes under a minute.
If you’re on a Samsung phone, look for the eye icon next to the masked password in Wi-Fi settings, or use the QR code method if your build hides the plain text entirely.
If you’re on Pixel or Motorola, the stock method works exactly as described, no extra steps needed.
If you want all saved passwords at once, use Shizuku + WiFiList on Android 11+.
If the Share option isn’t showing up at all, check whether you’re on an enterprise network, a work-managed device, or a phone without a screen lock before assuming something’s broken.
If you’re on an older Android (version 9 or below), you’ll need root access and a recovery app like WiFi Key Recovery.
If you’re an IT professional working on a rooted device you’re authorized to service, ADB gives you the most control and flexibility.
Final Thoughts
Finding a saved Wi-Fi password on Android doesn’t have to be stressful. Once you know the right steps for your specific phone and Android version, and what to do when the option seems to vanish entirely, it takes less than a minute.
Not every method applies to every phone, since Android skins vary by brand and version. If a method doesn’t show a Share option or password field on yours, check the troubleshooting section above or try the next one for your device.
The key takeaway is this: your phone already has the password stored. You just need the right path to reach it. Bookmark this page so you never have to scramble when someone asks for the Wi-Fi again.
Frequently Asked Questions
Everything you need to know about finding and exporting saved Wi-Fi network credentials on Android.
How do I find my saved Wi-Fi password on Android without rooting?
On Android 10 and newer, navigate to Settings > Network & internet > Internet, tap the settings gear next to your active network, and select Share. Following biometric or PIN verification, the plain-text password is displayed directly beneath the generated QR code.
Can I view credentials for previously connected networks?
Yes. Go to Settings > Network & internet > Internet and scroll down to Saved networks. Select any entry from the history list and tap Share to authenticate and view the stored security key.
How do I reveal Wi-Fi passwords on a Samsung Galaxy device?
On Samsung One UI, go to Settings > Connections > Wi-Fi, select the gear icon next to your network, and tap the eye icon adjacent to the masked password field. On legacy One UI releases, generate the network QR code and decode it using a scanner tool.
Does the process differ on Google Pixel and Motorola hardware?
Both manufacturers utilize stock Android architecture. The native path Settings > Network & internet > Internet > Share reveals credentials directly without secondary decoding applications.
What payload is encoded inside the sharing QR code?
The QR payload follows the standard Wi-Fi Easy Connect format:
WIFI:S:Network_SSID;T:WPA;P:Security_Key;;. This structured text contains the Service Set Identifier, authentication protocol (WPA/WPA2/WPA3), and cleartext password.What should I do if the QR code renders without plain text below it?
Capture a screenshot of the QR code and scan the image using Google Lens or any standard barcode scanner. The underlying text string will be parsed, displaying the key directly.
Why is the Share option missing for select saved networks?
The Share action is disabled for WPA-Enterprise / 802.1X networks that rely on individual RADIUS user certificates rather than pre-shared keys. It is also restricted if your device lacks an active lock screen credential or is governed by MDM (Mobile Device Management) enterprise policies.
How can I batch-export all stored network passwords at once?
On non-rooted devices running Android 11 or higher, connect the Shizuku service via Wireless Debugging, then deploy open-source utilities like WiFiList to query the system Wi-Fi service and export your configurations to a structured CSV file.
How are Wi-Fi passwords retrieved on legacy Android (9.0 and earlier)?
Legacy systems lack native QR sharing APIs. Root access is required to directly read the configuration store located at
/data/misc/wifi/wpa_supplicant.conf or /data/misc/apexdata/com.android.wifi/WifiConfigStore.xml.Will viewing a saved password modify or reset router parameters?
No. This operation executes a read-only query against the local encrypted configuration store on the device. It has zero impact on access point settings, encryption parameters, or active client connections.